The words “marketing automation” aren’t music to everyone’s ears. This popular buzzword can bring back memories of crazy-complex CRM software for some people. It can evoke thoughts of endlessly boring meetings spent configuring that software, followed by more time and annoying headaches incurred trying to get it to actually work.
If you didn’t already have enough reasons to love email marketing, add marketing automation to the list. With careful use of autoresponders and email triggers, you can set up quite an elegant marketing automation system. No headaches required.
You won’t need any software you don’t already have, either. Your Pinpointe account can serve as a marketing automation system.
Email marketing is actually where marketing automation got started. Email marketing is the core functionality of any marketing automation package.
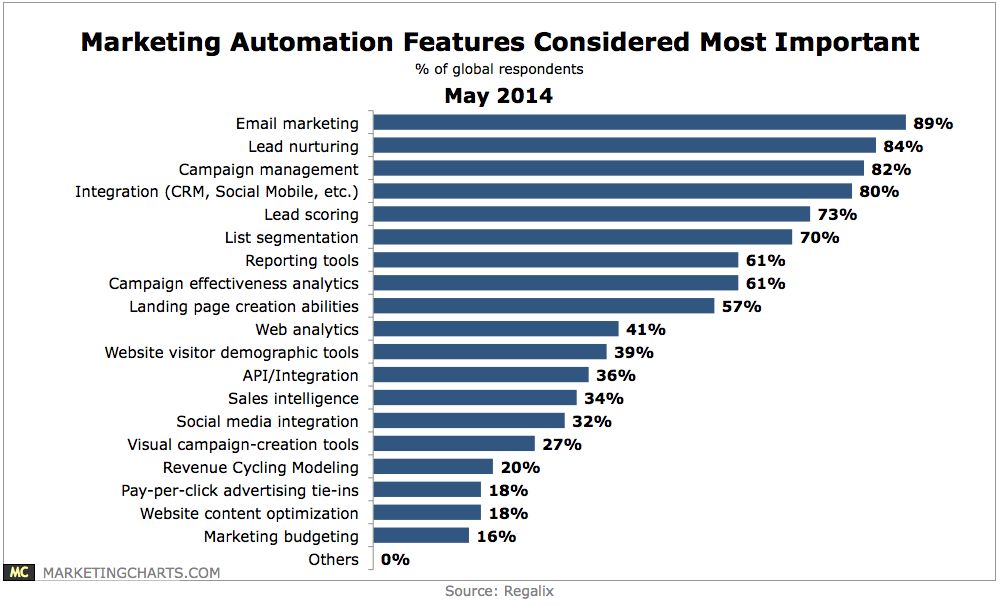
You can see how essential email is to marketing automation in the chart below from Regalix. It shows which marketing automation features marketers think are most important. The chart shows it’s email all the way.
Email marketing is specifically mentioned as #1, followed by lead nurturing (another core email function). Campaign management and list segmentation are also high on the list. We’ll show you how to do both of those with email later on in this post.
The truth is, people have been using email marketing as marketing automation for decades. They just called it an autoresponder.
Autoresponders in a nutshell
As you know, an autoresponder is a series of email messages. Those messages are sent at intervals the marketer specifies. One classic example of an autoresponder would be an email course. When you sign up for that emailed course, you automatically get the autoresponder messages the marketer has queued up.
Marketers can control how often autoresponder messages are sent. For example, they can send an autoresponder every four days, or every two days. They can also add messages to the autoresponder. Some email service providers (like Pinpointe) let you re-arrange the autoresponder messages, too.
The welcome email as autoresponder
An email welcome series, or “onboarding sequence” is a more current example of an autoresponder. Welcome series or welcome emails are sent automatically as soon as someone signs up. The marketer doesn’t have to schedule each email, like they would have to do with an email newsletter.
Welcome series are usually made up of one to five emails. But there’s no limit to how many autoresponder messages you can send, if you’ve got the right email provider. Pinpointe lets you send unlimited autoresponder messages.
Some marketers have autoresponders with a whole year’s worth of messages. They’ve got 300 or more email messages queued up. Other marketers stick with about 10-20 emails for a given e-course. Depending on how subscribers respond to their messages, a marketer may stop sending emails after they've completed the course, or might move subscribers to another list.
How triggered emails fit into marketing automation and behavioral email
That brings us to email triggers, also called triggered emails. It also brings up to “behavioral marketing”, which is another buzzphrase in marketing these days. It may be a buzzphrase, but there’s a reason for the buzz – sorting people according to how they interact with your emails is a proven way to rocket results. Some email marketers have reported 70% increases in sales and other engagement metrics from using just a few triggered emails.
Email triggers work well, and your Pinpointe account makes using them easy. So we wanted to give you a refresher course in how to use email triggers for your own marketing. We’ll close out this post by showing you, step by step, how to set up an email trigger in your Pinpointe account.
Let’s get started.
9 examples of what you can do with triggered emails
1) Send subscribers a specific email message when they click a particular link in any one of your email messages.
For example, someone clicks on a link that goes to a promotion about your next webinar. Even if they don’t sign up for that webinar, you can send them a followup email reminding them about the webinar.
2) Pass people from one email list to another based on which links they click in your emails. This is an elegant way to send customized content based on people’s actual behavior, not just what they say they’re interested in.
3) You can also pass people from one list to another if they just opened an email. This is an ideal way to send a follow-up email or to choose which people to resend an email to.
4) In Pinpointe you can control all these actions down to the hour. We’ll walk you through how to do that in our triggered email set up tutorial below.
5) You can also add people to a list or send them a customized message based on when they got on your list. This is one of the best ways to segment people out for a re-engagement campaign. Add everyone who signed up, say, three to six months ago to a specific list. Then pull everyone who never opened or clicked your emails. With the remaining list you’ll be able to send a different email to people depending how long they’ve been inactive.
6) This one is a little obvious, but it shows how long we’ve all been using triggered emails. Remember order confirmation emails? Transactional emails? Those are, by definition, all triggered emails.
7) You could incorporate some dynamic content into your triggered emails, too. This email from TripAdvisor is sent automatically every month. It pulls some customized data from analytics to create a very interesting, personalized email for subscribers.
8) Cart abandonment emails are another example of triggered emails. If you’ve ever visited Amazon and signed up for their emails, much less ordered something, you’ve already seen some of the most effective triggered emails anywhere.
9) Replenishment emails. These are emails sent when a customer might be running out of what they ordered. This works well for things like dog food and cosmetics, but you could also apply to professional services, or to B2C services like car or home insurance. If someone is buying quarterly auto insurance, it would be sensible to reach out to them via email to review their policy before they got billed for a new quarter.
Plan email triggers before you build them
One word of advice before you dive in too deep with autoresponders and triggers: Don’t get trigger happy. Plan the flow of your emails and your customers’ journey through your autoresponders, triggered emails and promotional emails. Flow charts seem to work best. This type of planning can save a lot of headaches, a lot of work and a lot of time. It makes it far easier to develop great emails and a great customer experience, too.
How to set up an email trigger in Pinpointe
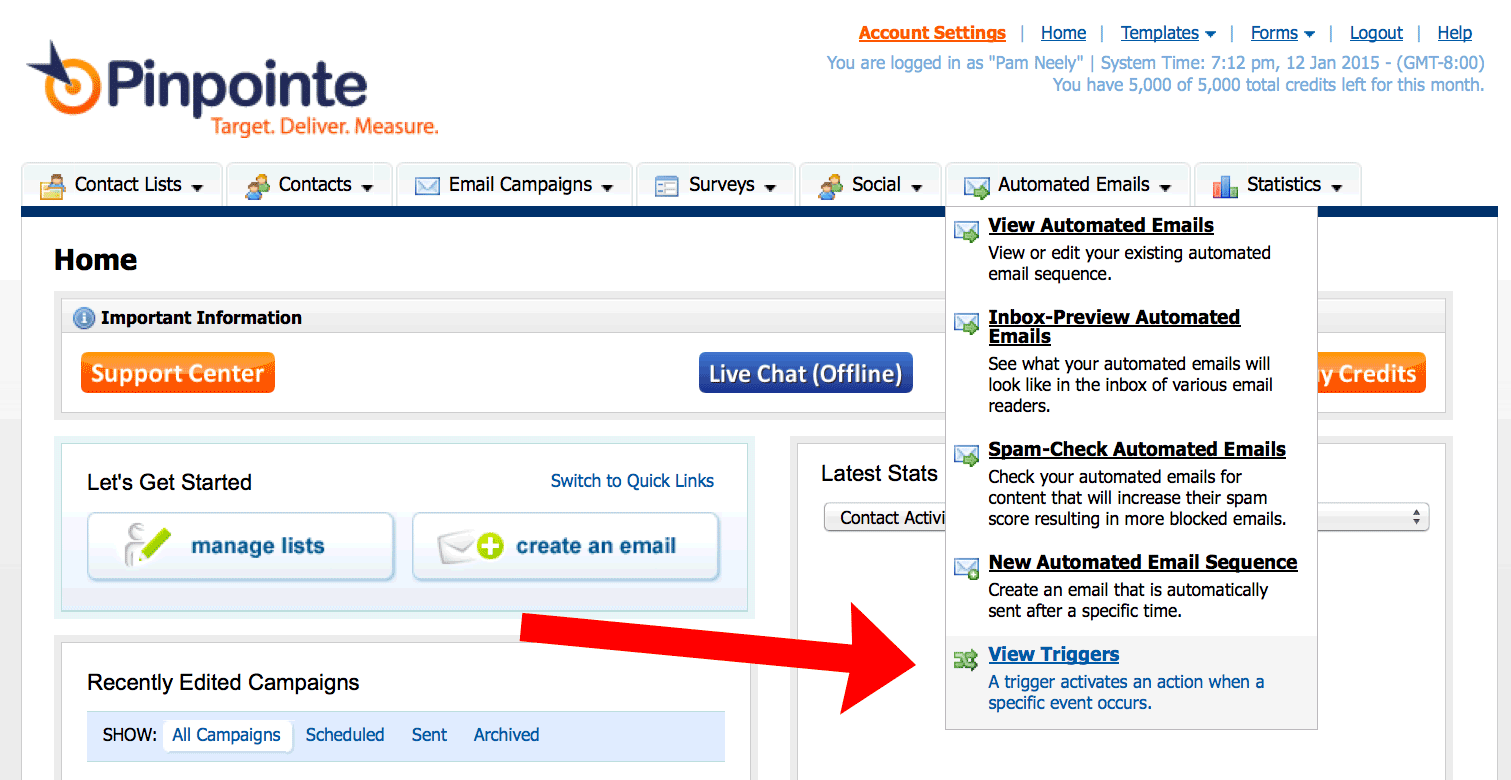
1) Go to the “Automated Emails” Tab in your dashboard and select “View Triggers”.
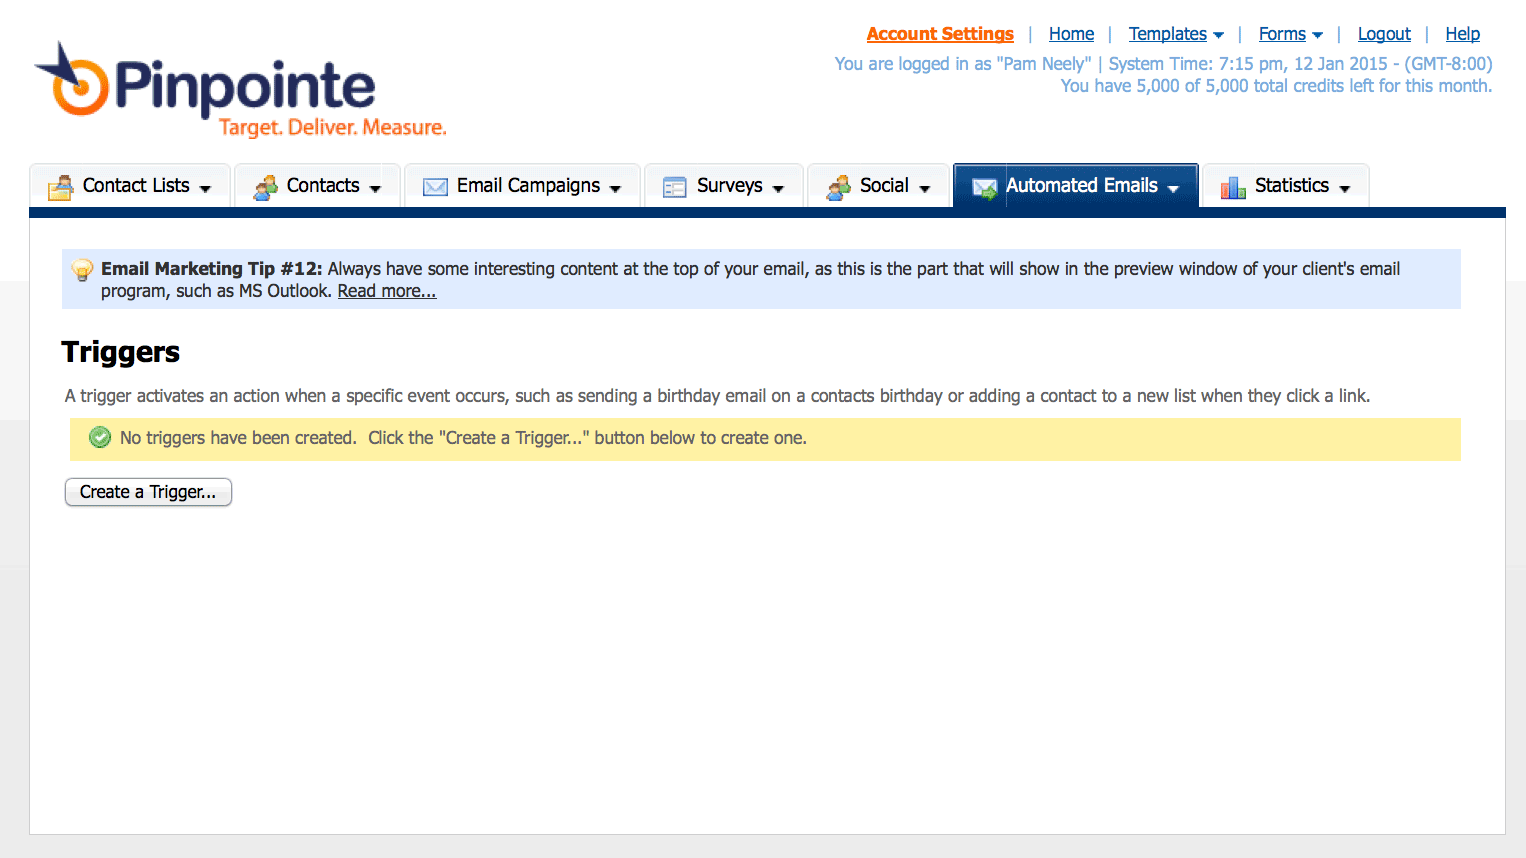
2) The first time you set up an email trigger, you won’t see any in this section. It will look like this:
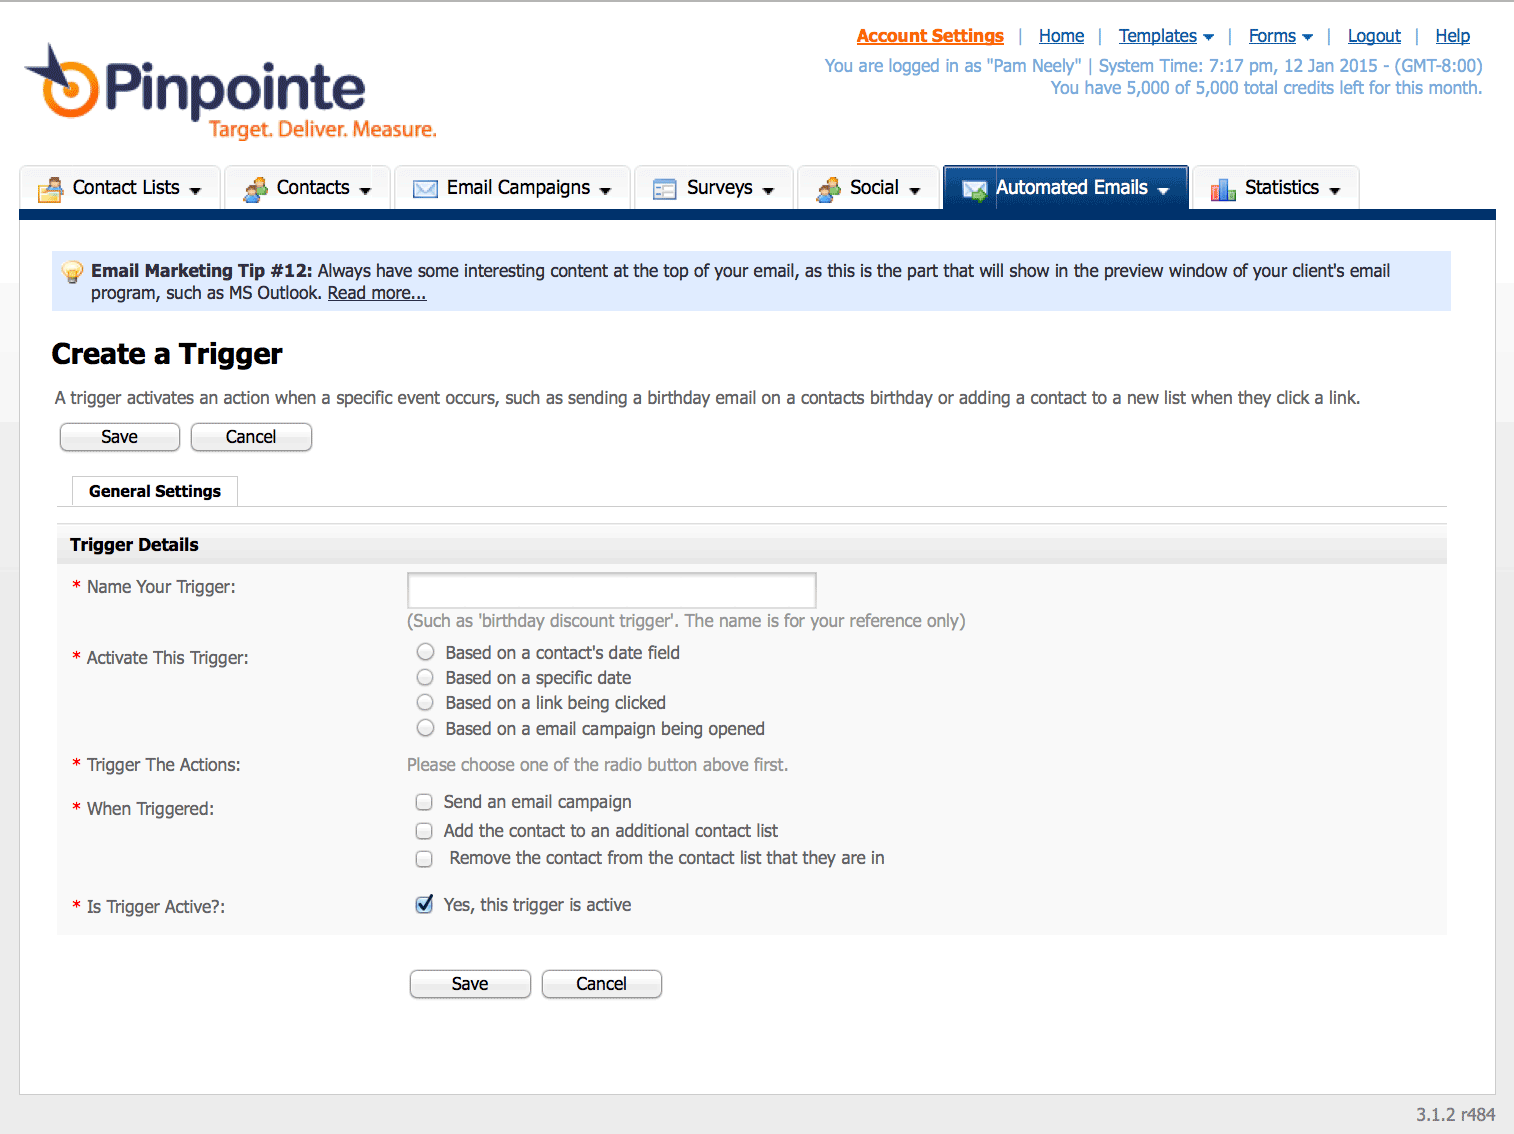
3) Click the gray “Create a Trigger” button and you’ll see a page like this:
4) The first thing to do is to name your trigger. I find it helpful to include a date when I name things like this, just so I have a quick reference point for later, like a year from now when I’ll be looking through a whole list of triggers and might not remember which is which.
It’s also helpful to explain what the trigger does. In my example, I’ve named my trigger “Welcome Email Blog Link Clicked 1/13/15”. That tells me which email and which link in that email triggers this action.
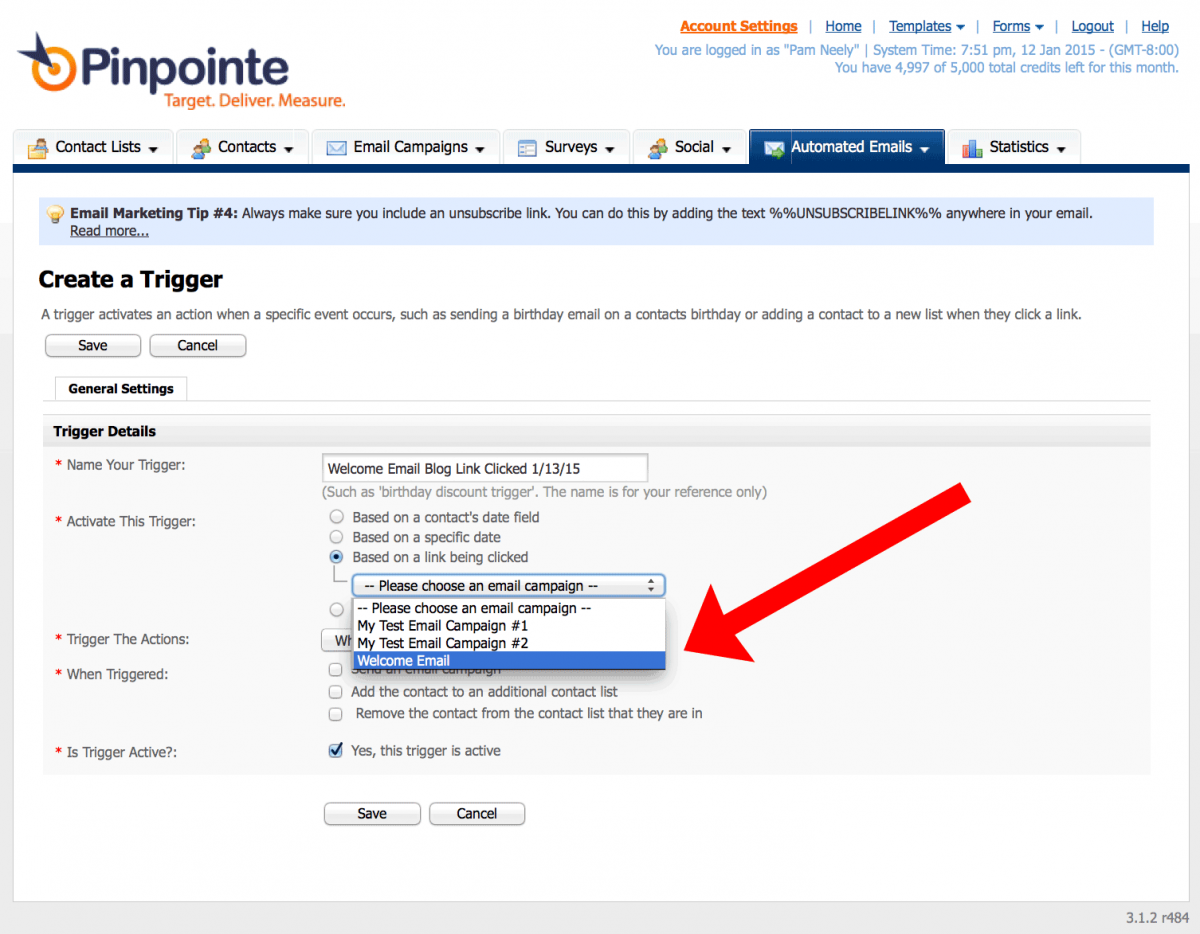
5) Because I want this particular trigger to be activated when someone clicks a link, I’m going to select that option from the radio button in the next section of this page. Pinpointe will immediately show the emails I’ve got set up. It will ask me to specify which email has the link I want to use to activate the trigger.
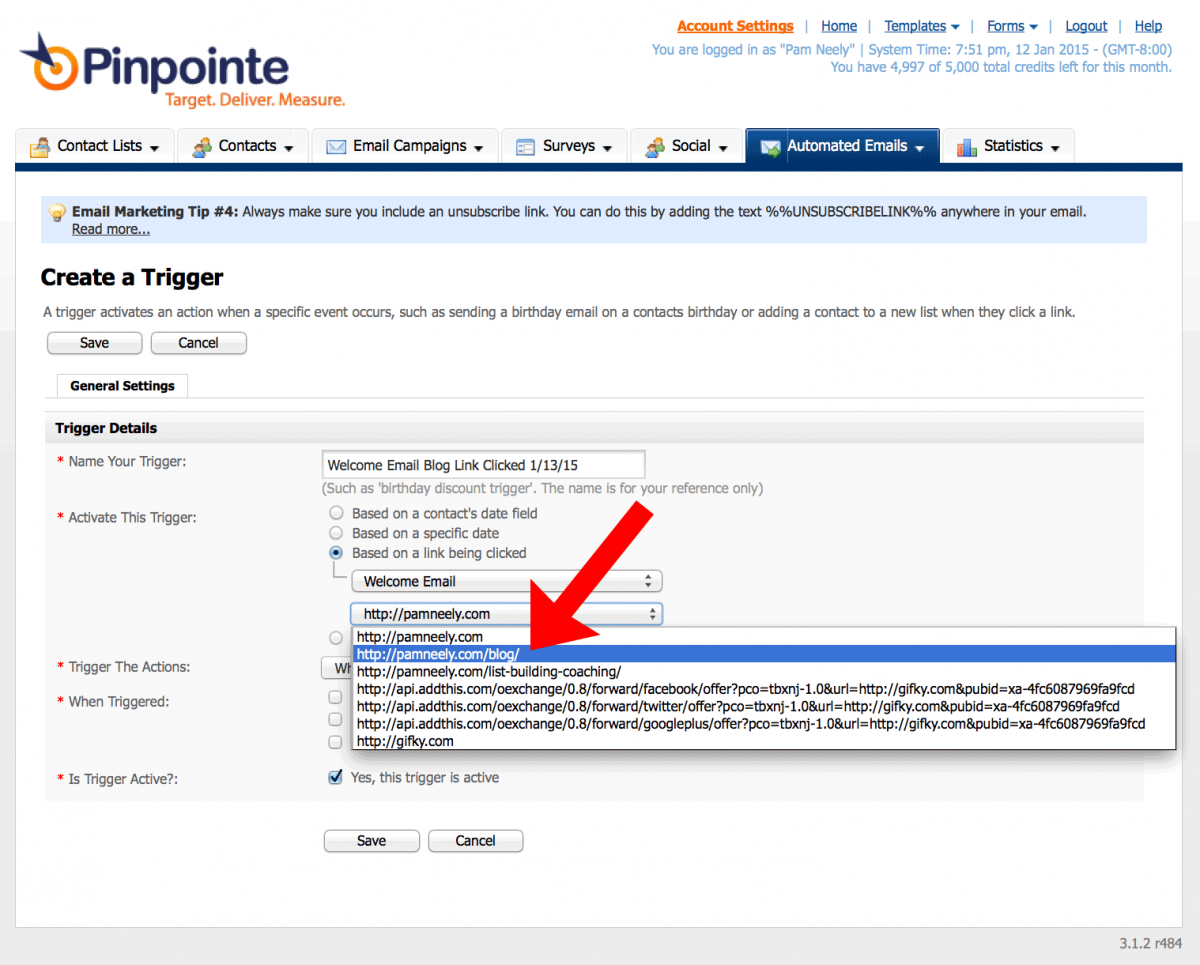
6) Next, I’ll specify which link in that email I want to activate the trigger.
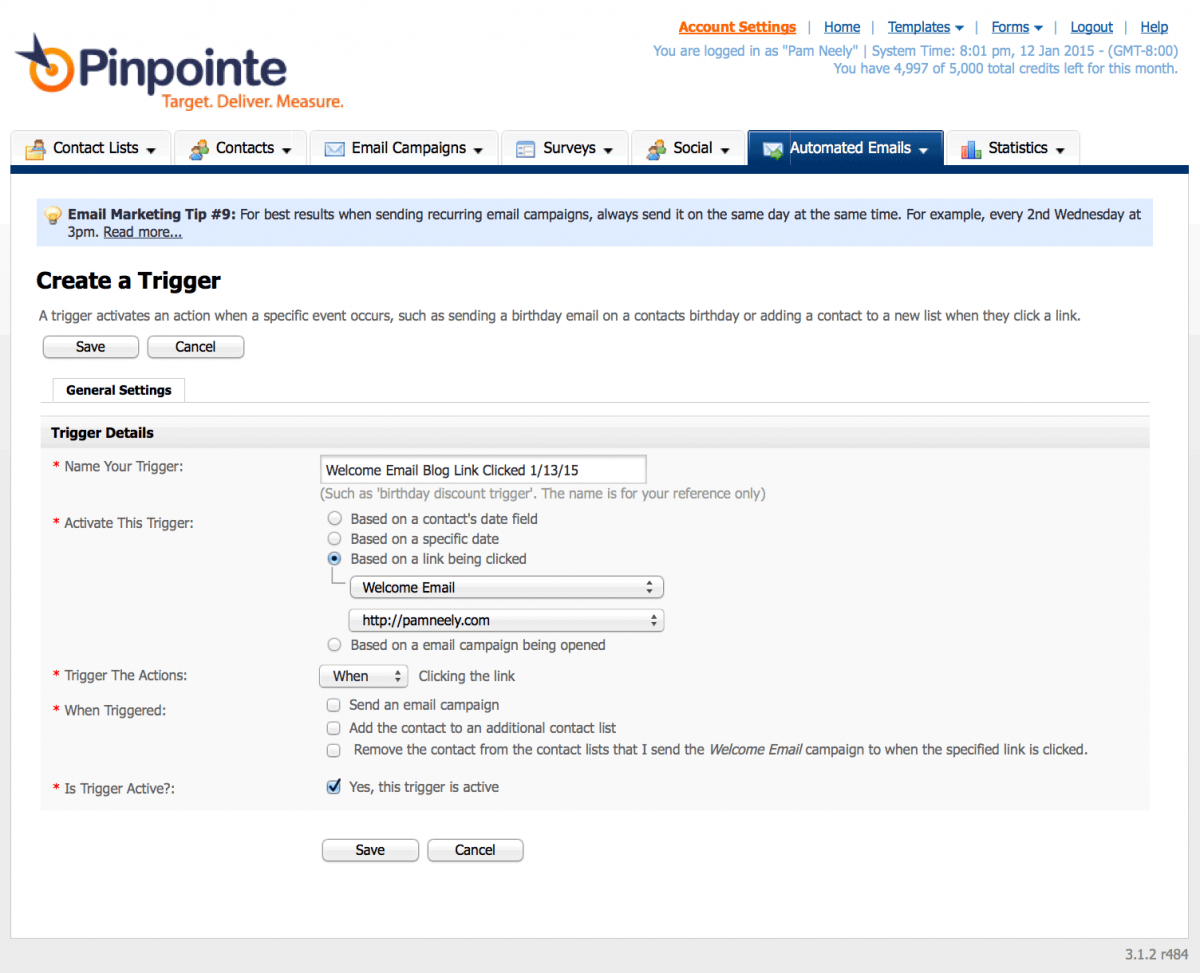
7) At this point, I’ve defined what needs to happen to activate the trigger. Now I need to tell the Pinpointe system what to do once the trigger has been activated.
Pinpointe has an unusually nice feature here. Typically, you can only activate a trigger immediately after something has happened, or sometimes you can specify how many days after a trigger has occurred to do something. Pinpointe lets you control when the trigger will happen down to the hour.
For my example, I want anyone who clicked this link to get passed to the new list immediately. So I’ve selected “Trigger the actions When Clicking the link”. But I could have selected “Trigger the actions After Clicking the link”. That would have shown me this set of options:
The hours pull-down can also be set to days. This would be an ideal feature to use if you wanted to send people an email in, say, the morning and the evening.
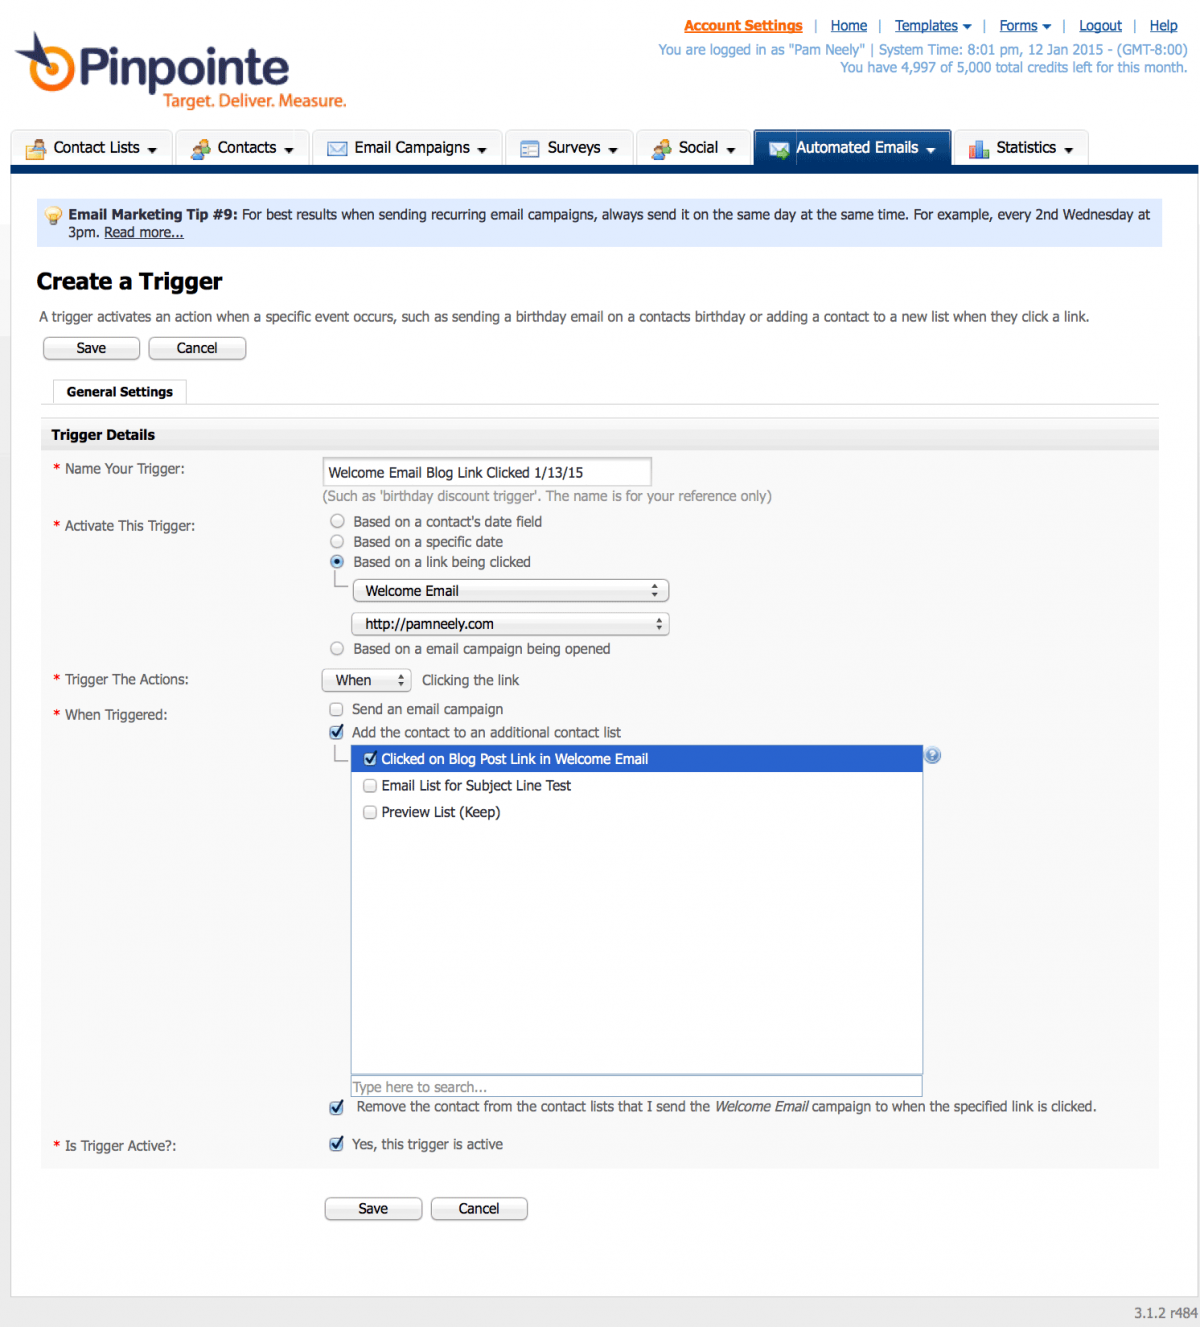
8) Going back to my example, I’ve set this page up so that whoever clicks that blog link will get moved to a specific list, set up just for blog link clickers. I will also take anyone who clicks on this blog link off the old, general list. That way I won’t be swamping them with emails.
I have created a list already (you have to have a list already created), named “Clicked on Blog Post Link in Welcome Email”.
It looks like this:
9) The “Yes this trigger is active” checkbox is checked, so the only thing I have to do now to make this trigger work is to click the “Save” button.
Now, every time someone clicks the blog link in my welcome email, I’ll move them to a list that’s exclusively about blog updates. This is a very simple, but elegant way to customize my email messages based on what people are actually interested in. Note that this requires no preferences center, and I’m not sending content based on what people say they’re interested in, but in what they’ve proved they are interested in based on their behavior.
Just in case you run into any trouble with your triggers, here’s the link to our trigger troubleshooting page.
So that’s how to set up a simple triggered email, and a bunch of ideas for what you can do with triggers in your account. Have you already got any email triggers set up? Are there any other ways to use them I didn’t include in this post? Let us know in the comments.

