Are you looking for a simple way to grow your contact list? Adding an email subscription sign up form to your website is a great way to achieve this because it conveniently allows people to sign up for your email communications. By following a few simple steps, Pinpointe customers can easily generate the HTML code needed to add to a sign up form to any page on your website.
Note: Before you get started you should have already created a contact list in order to import contacts. For more information on how to create a contact list – watch “Managing Lists & Contacts.” Your form can also collect other data about your contacts, including name, age and sex, state, etc. To set these parameters, you must first create a custom field for each custom variable. For more information on how to create custom fields – watch “Using Custom Fields.”
Below are the step-by-step instructions to create your own sign up form for your email communications.
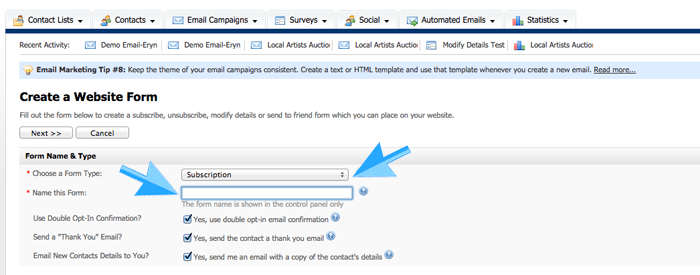
Once you are in your Pinpointe account click the Forms tab in the upper right hand corner. On the drop down menu, click Create a Website Form.

A new screen will pop up. Under Choose a Form Type, select Subscription, name your form and choose if you would like to include the following with your Subscription form:
- Use Double Opt-In Confirmation – New sign ups will receive an email that contains a link they must click in order to confirm their subscription. If the link is not clicked, they will not be added to your email list.
- Send a “Thank You” Email – A “Thank you” email will be sent to any contact that signs up for your subscription list.
- Email New Contact Details to You – The list owner will be send the new contacts’ information
Next, choose the list(s) and fields(s) you want to add to your subscription center form.
Note: Email address is always required.

If you want your fields to show up in a certain order (optional), you can move them by clicking on them and moving them while holding down your mouse. When your done, click the Next >> button.
On the next page you can preview your form, edit your form details, choose your form design, choose the email campaign format of your “Thank You” email, and select if you would like to include a CAPTCHA security form on your subscription sign up page.

If you would like to make any edits to your form – this is the place to do it. You can now edit each form field by hovering over a form field box – a pencil icon will pop up. Click it to edit how that form field will show up (or not show up) on your subscription center page.
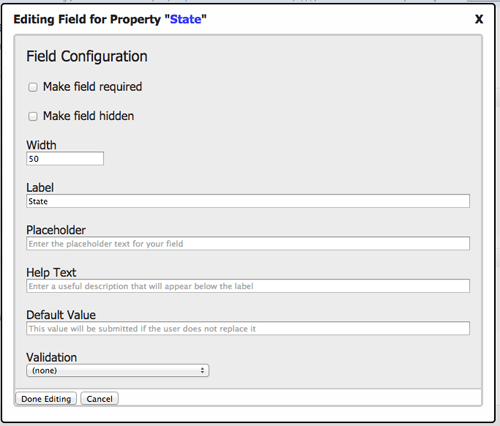
When you’re making edits to each form field, ensure they will make sense to the viewer.
Once you have made all of your modifications, click Next >> button.
Review the next 2-3 pages (depends on previous selections) and make any modifications necessary, then click the Save button. The HTML code* will then show up. Copy it and send it to your website administer.
* This code can only be used on your own website and will not be hosted by Pinpointe.
We continue to improve our email marketing and automation solution. For any questions or suggestions, please contact Pinpointe support at support@pinpointe.com.